Printable Embroidery Placement Guide
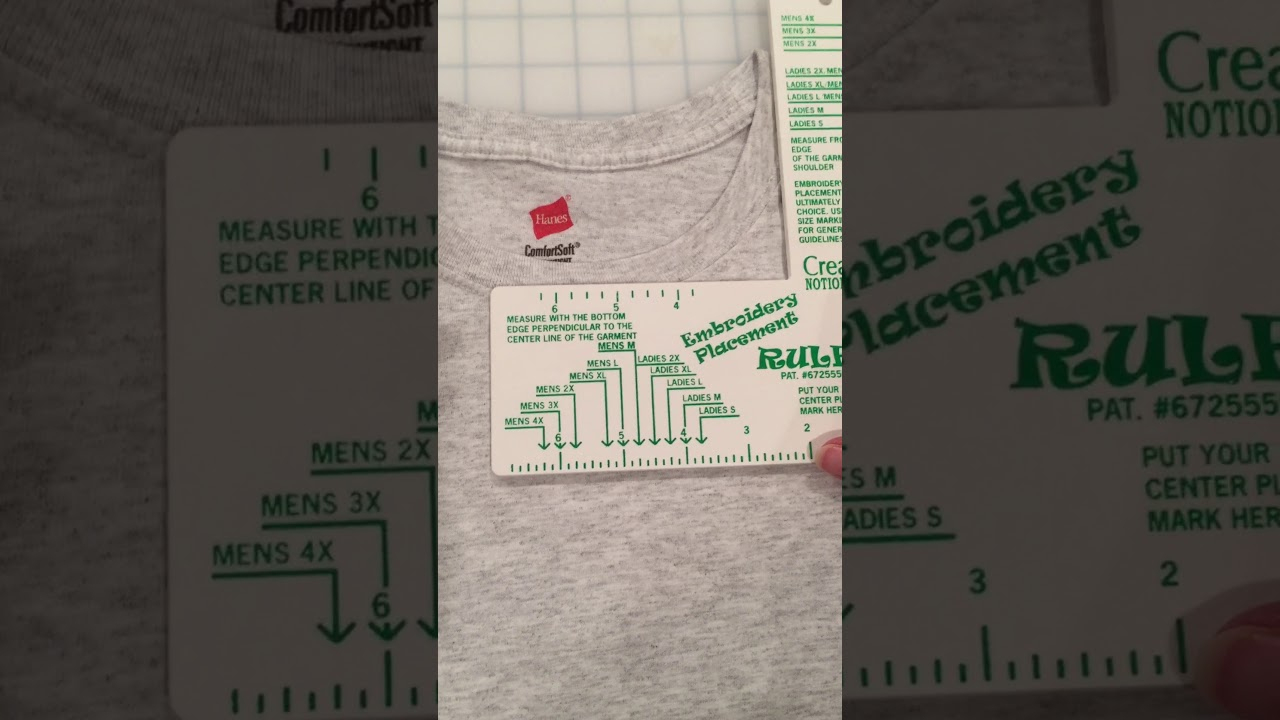
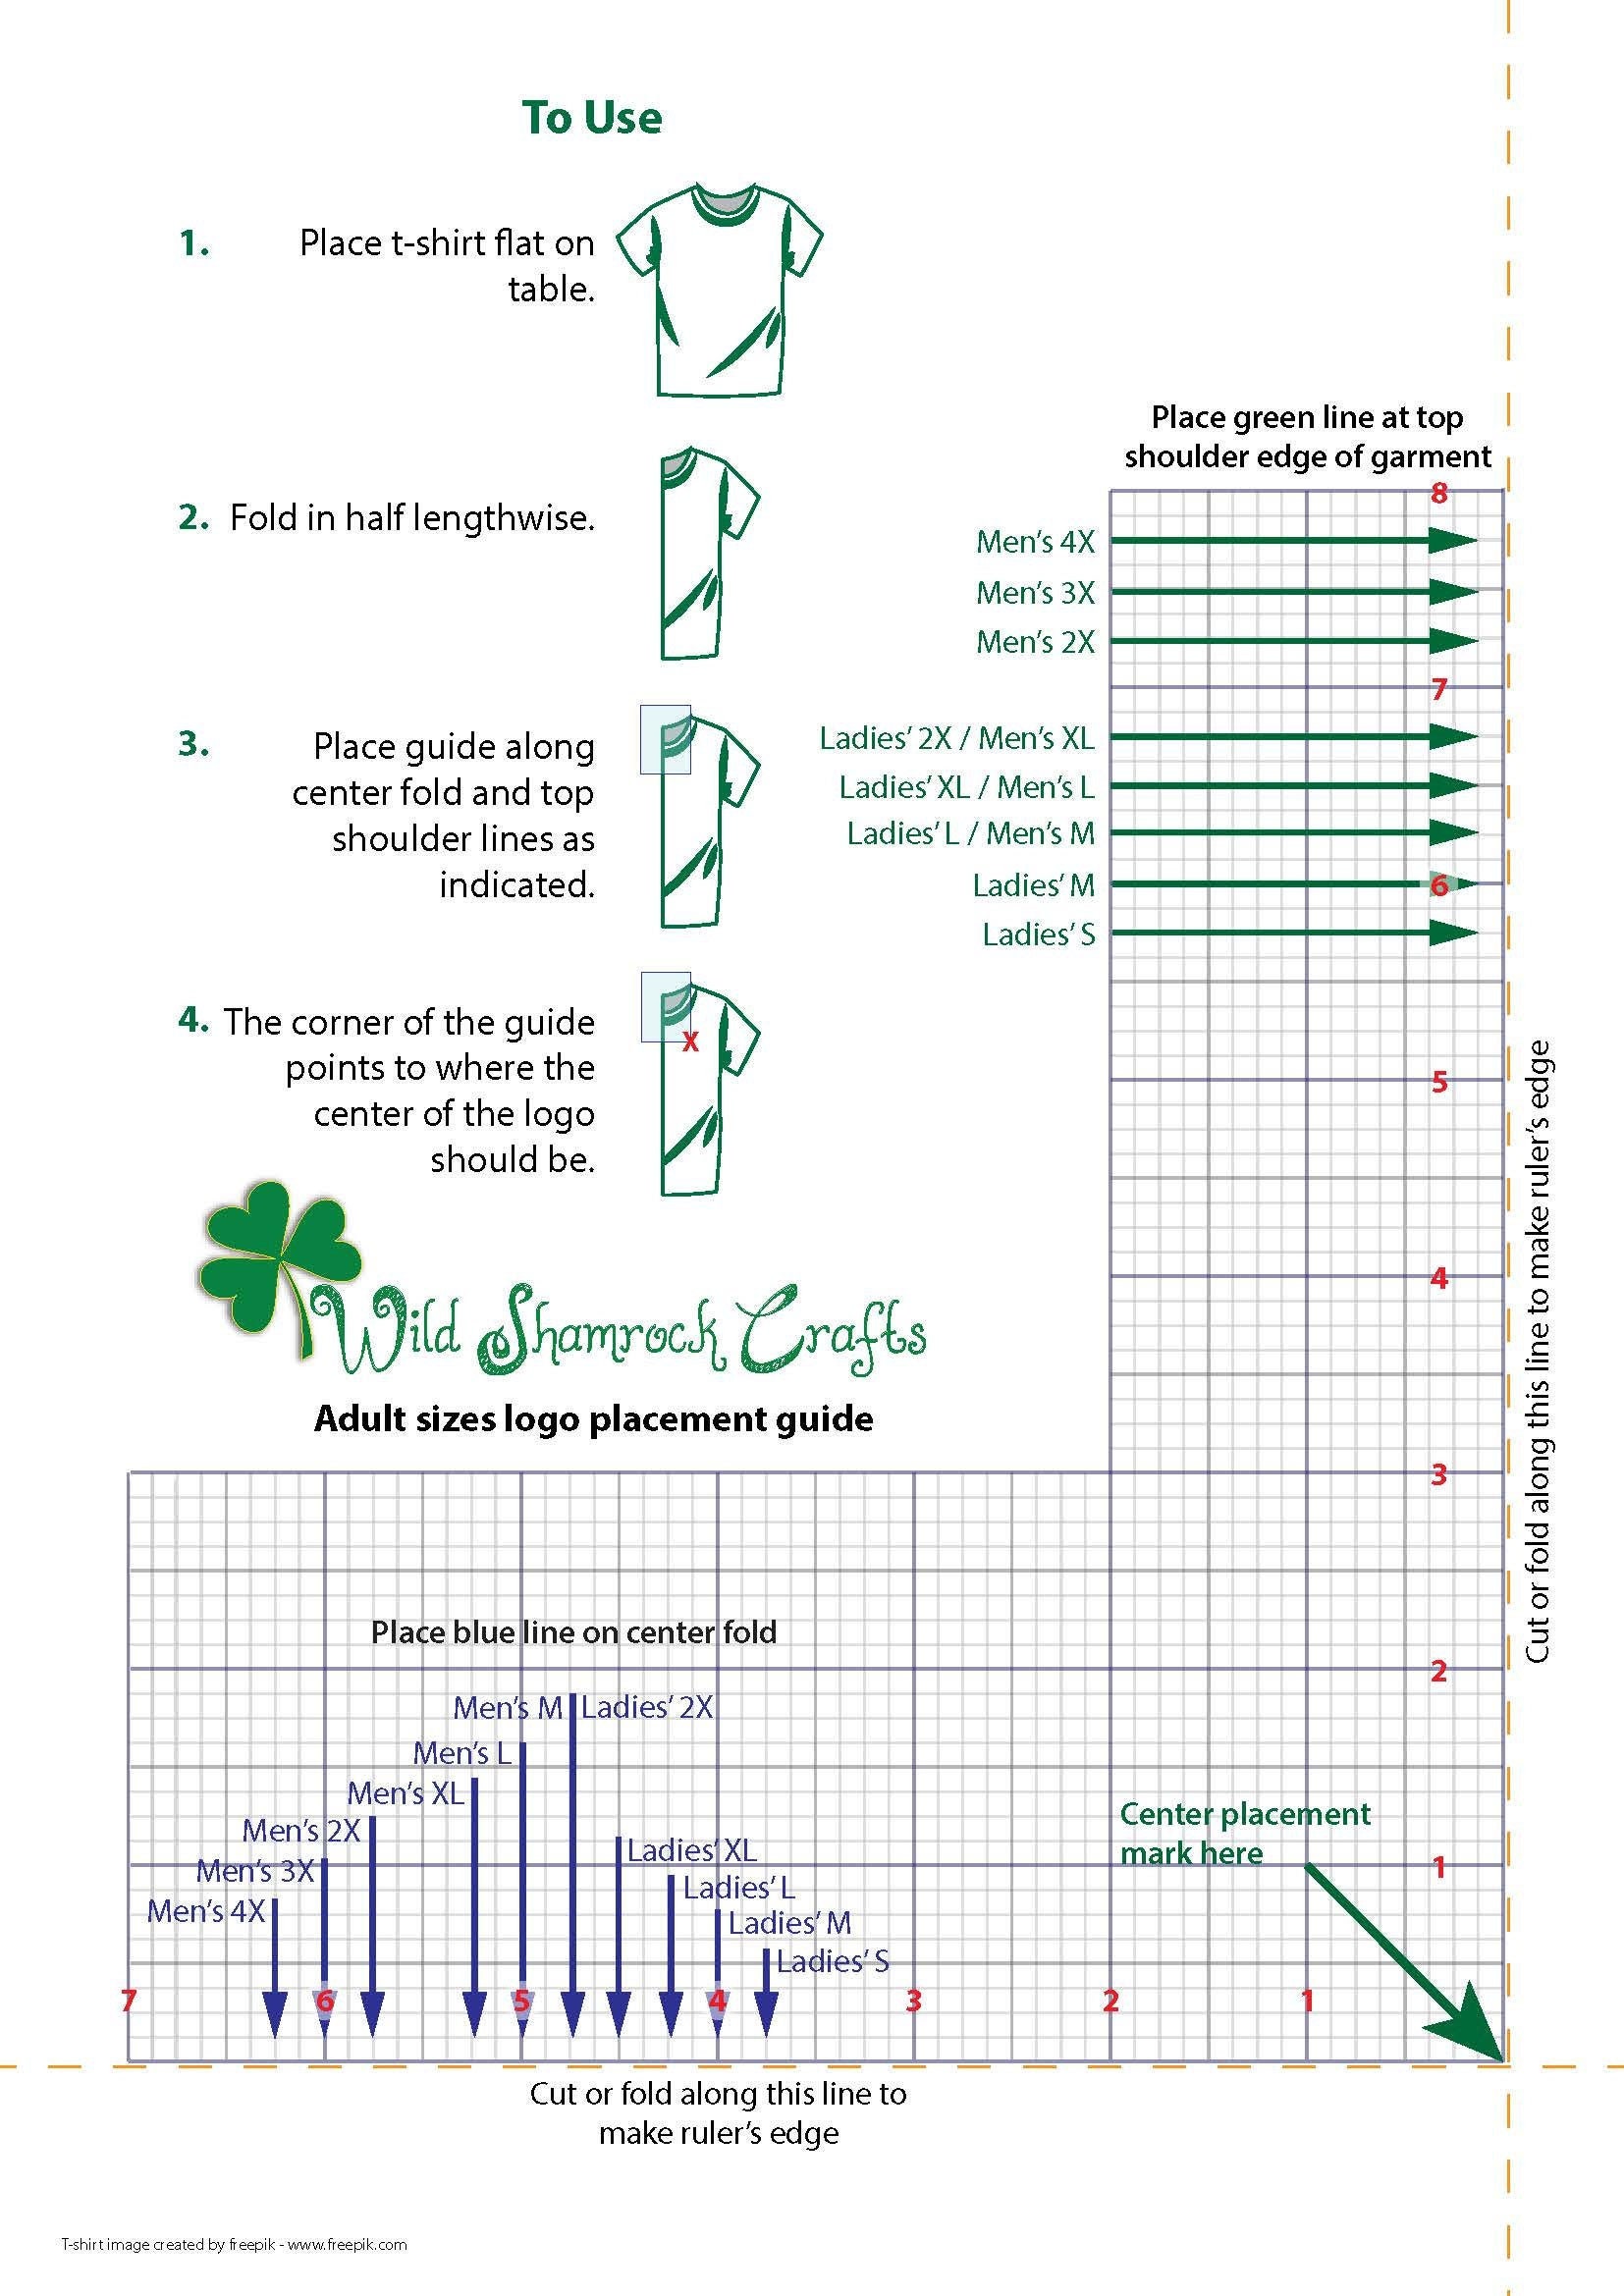
Printable Embroidery Placement Guide - How to determine the embroidery placement measurement. Correct design placement depends largely on individual taste. Whether you're a seasoned embroiderer or just starting, understanding the nuances of placement is crucial. This guide provides essential information and techniques for accurately placing embroidery designs on various garments. There are many factors that depend on the positioning of your embroidery, like size, design, garment. Various embroidery positions 1 tearaway cuff 4” above top stitching at 1 3/8” from button hole, 1/ cuff edge 1 tearaway (opt) pocket 1/4” to 1/2 down from pocket edge, centered between. For finding exactly where you should place the design accurately, measure the width of the item, usually on. Use a similar distance between bottom of design and edge of. We've put together an embroidery placement guide to get you started. Your printout will have helpful markings,. Learn to measure, mark, and consider design size. The chart for the left/right placement works for most applications but there are other factors to be taken into consideration when placing logos on the left or right chest of shirts, jackets and. Below you will find guidelines for placing designs on everything from bibs to polo shirts, onesies to jacket backs. Correct design placement depends largely on individual taste. We have created a guide to get you started and assist you with embroidery placement. There are many factors that depend on the positioning of your embroidery, like size, design, garment type, and more. Logo placement on hoodies significantly impacts brand visibility and message delivery.; For finding exactly where you should place the design accurately, measure the width of the item, usually on. Print out designs before embroidering, and place them around the skirt to figure out equal distances between designs. This guide provides essential information and techniques for accurately placing embroidery designs on various garments. Print a template of the design from your embroidery software, at full size. If you want to get a printable pdf version of this page click here. Below you will find guidelines for placing designs on everything from bibs to polo shirts, onesies to jacket backs. Proper embroidery placement can transform a simple garment into a masterpiece. There are many. We have created a guide to get you started and assist you with embroidery placement. Various embroidery positions 1 tearaway cuff 4” above top stitching at 1 3/8” from button hole, 1/ cuff edge 1 tearaway (opt) pocket 1/4” to 1/2 down from pocket edge, centered between. We've put together an embroidery placement guide to get you started. There are. Print a template of the design from your embroidery software, at full size. Logo placement on hoodies significantly impacts brand visibility and message delivery.; This guide provides essential information and techniques for accurately placing embroidery designs on various garments. For finding exactly where you should place the design accurately, measure the width of the item, usually on. Use our embroidery. Various embroidery positions 1 tearaway cuff 4” above top stitching at 1 3/8” from button hole, 1/ cuff edge 1 tearaway (opt) pocket 1/4” to 1/2 down from pocket edge, centered between. Logo placement on hoodies significantly impacts brand visibility and message delivery.; The chart for the left/right placement works for most applications but there are other factors to be. Proper embroidery placement can transform a simple garment into a masterpiece. There are many factors that depend on the positioning of your embroidery, like size, design, garment. The most common design placement options include the center chest, left chest,. Below you will find guidelines for placing designs on everything from bibs to polo shirts, onesies to jacket backs. Print a. Various embroidery positions 1 tearaway cuff 4” above top stitching at 1 3/8” from button hole, 1/ cuff edge 1 tearaway (opt) pocket 1/4” to 1/2 down from pocket edge, centered between. We have created a guide to get you started and assist you with embroidery placement. The chart for the left/right placement works for most applications but there are. We have created a guide to get you started and assist you with embroidery placement. There are many factors that depend on the positioning of your embroidery, like size, design, garment. To get an idea for where you'd like to place a design, use a template. Print out designs before embroidering, and place them around the skirt to figure out. This guide provides essential information and techniques for accurately placing embroidery designs on various garments. Centered from left to right, centered from opening to decorative. Proper embroidery placement can transform a simple garment into a masterpiece. If you want to get a printable pdf version of this page click here. It's important to consider various factors such as the size. Whether you're a seasoned embroiderer or just starting, understanding the nuances of placement is crucial. We have created a guide to get you started and assist you with embroidery placement. Below you will find guidelines for placing designs on everything from bibs to polo shirts, onesies to jacket backs. Use a similar distance between bottom of design and edge of.. Use a similar distance between bottom of design and edge of. Proper embroidery placement can transform a simple garment into a masterpiece. If you want to get a printable pdf version of this page click here. There are many factors that depend on the positioning of your embroidery, like size, design, garment. Correct design placement depends largely on individual taste. Use our embroidery placement guide to get you started. There are many factors that depend on the positioning of your embroidery, like size, design, garment type, and more. Learn to measure, mark, and consider design size. Whether you're a seasoned embroiderer or just starting, understanding the nuances of placement is crucial. Free printable embroidery placement ruler how to determine the embroidery placement measurement to determine exactly where you should place the design measure the width of. If you want to get a printable pdf version of this page click here. Correct design placement depends largely on individual taste. Various embroidery positions 1 tearaway cuff 4” above top stitching at 1 3/8” from button hole, 1/ cuff edge 1 tearaway (opt) pocket 1/4” to 1/2 down from pocket edge, centered between. We've put together an embroidery placement guide to get you started. The chart for the left/right placement works for most applications but there are other factors to be taken into consideration when placing logos on the left or right chest of shirts, jackets and. Below you will find guidelines for placing designs on everything from bibs to polo shirts, onesies to jacket backs. The most common design placement options include the center chest, left chest,. This guide provides essential information and techniques for accurately placing embroidery designs on various garments. We have created a guide to get you started and assist you with embroidery placement. For finding exactly where you should place the design accurately, measure the width of the item, usually on. Centered from left to right, centered from opening to decorative.
Printable Embroidery Placement Guide Printable Word Searches
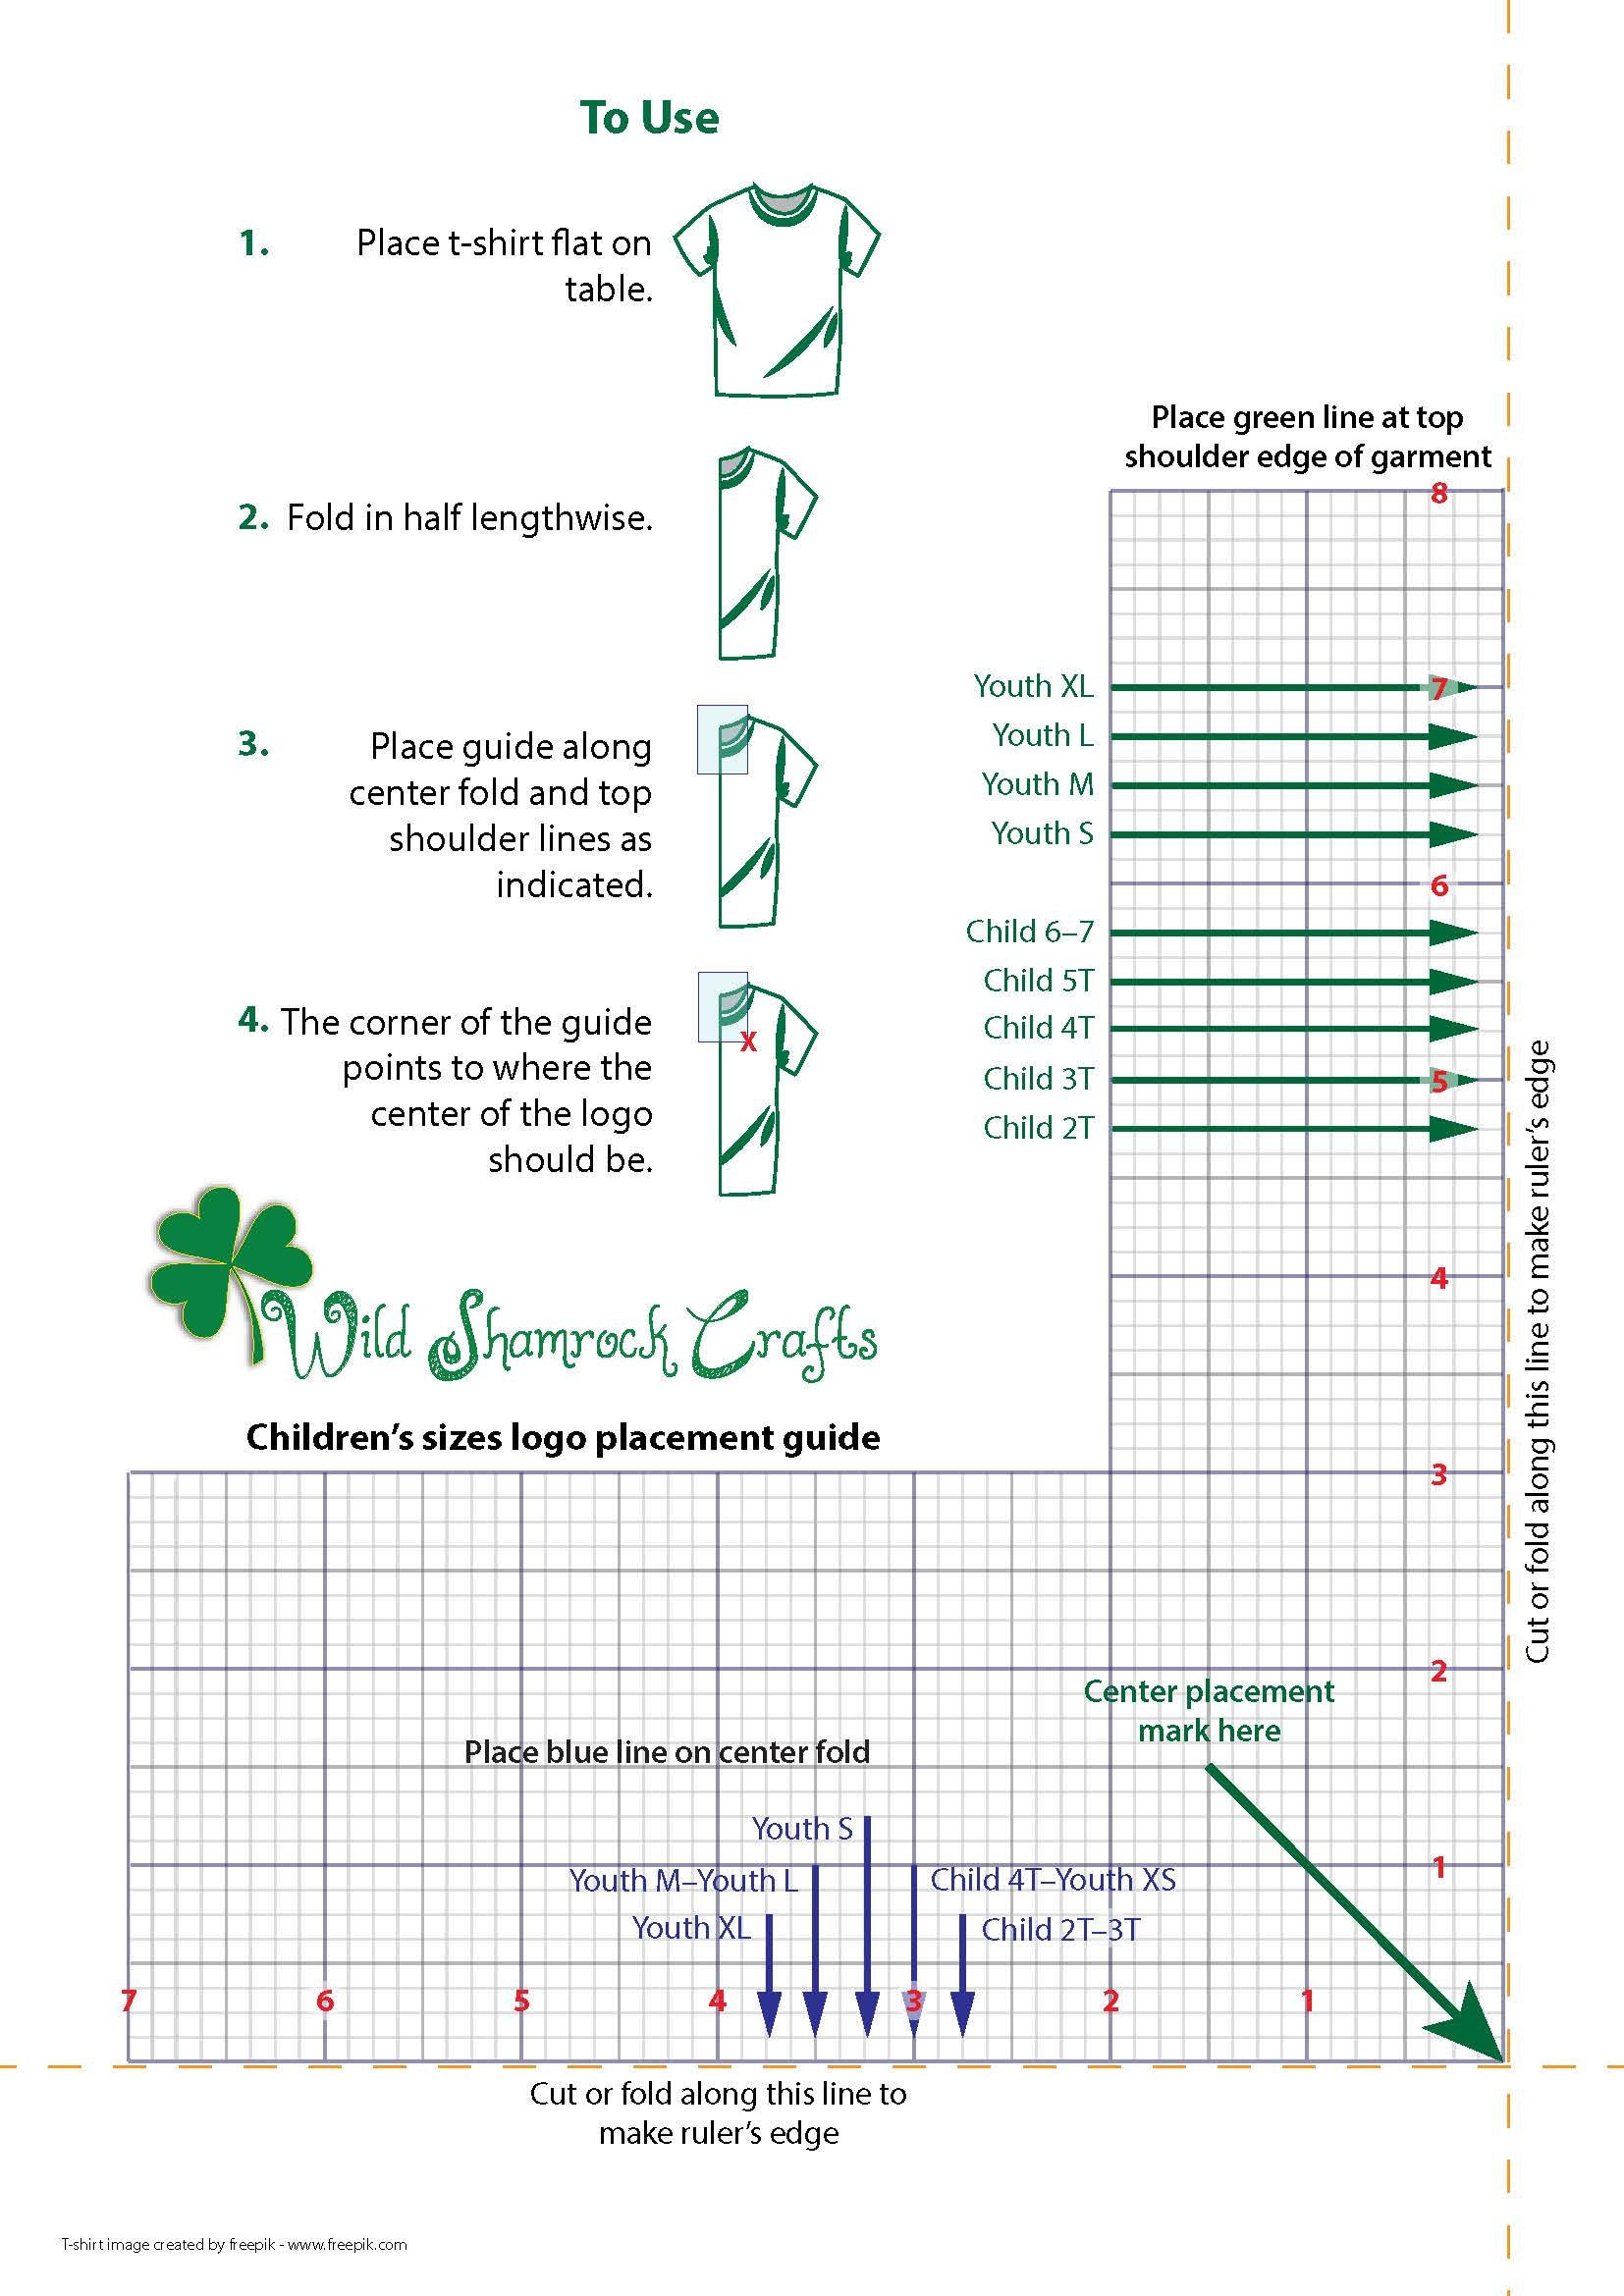
For Kids Printable machine embroidery logo placement guide Etsy

Printable Embroidery Placement Guide Printable Word Searches
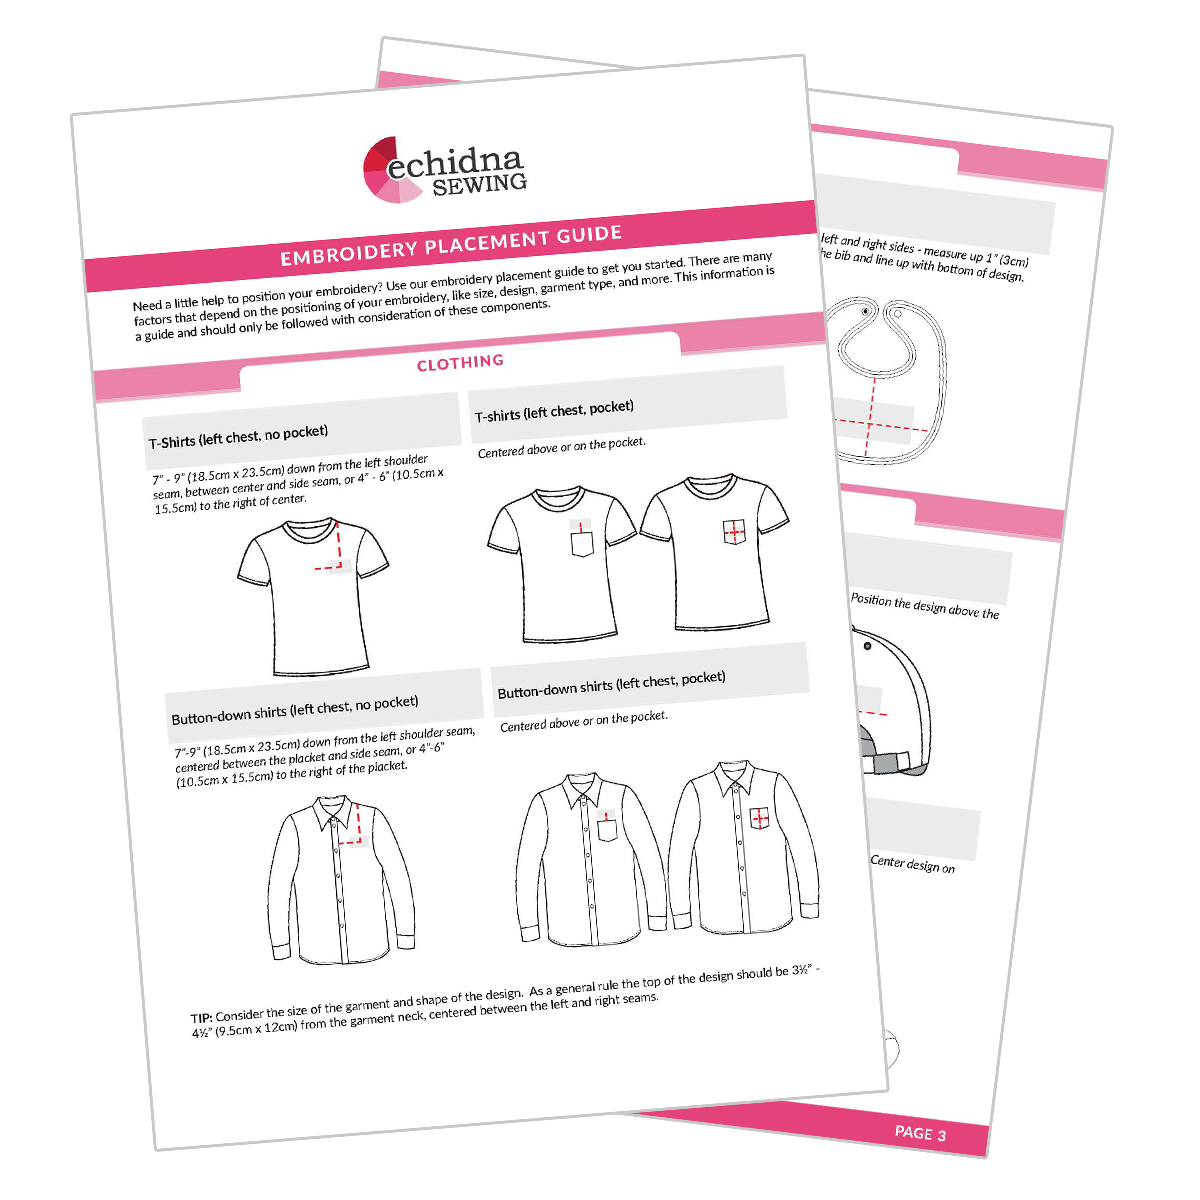
Embroidery Placement Guide PDF Download Echidna Designs
Free Printable Embroidery Placement Ruler Printable Templates

Printable Embroidery Placement Guide
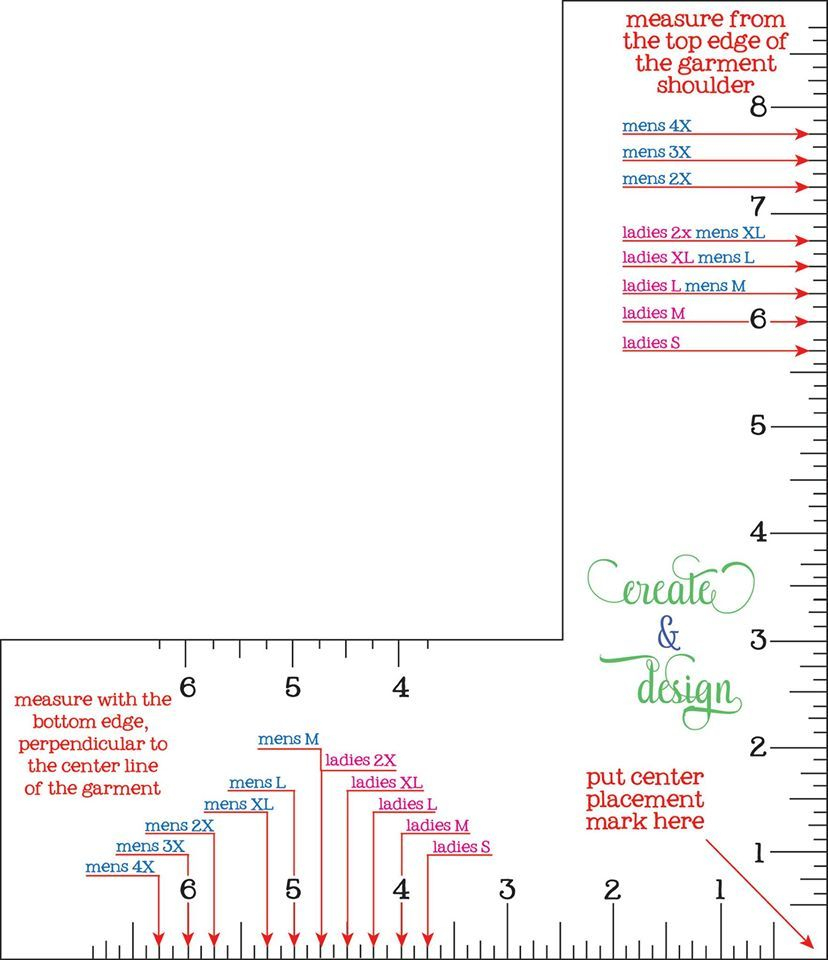
Free Printable Embroidery Placement Ruler
Free Printable Embroidery Placement Ruler Printable Word Searches
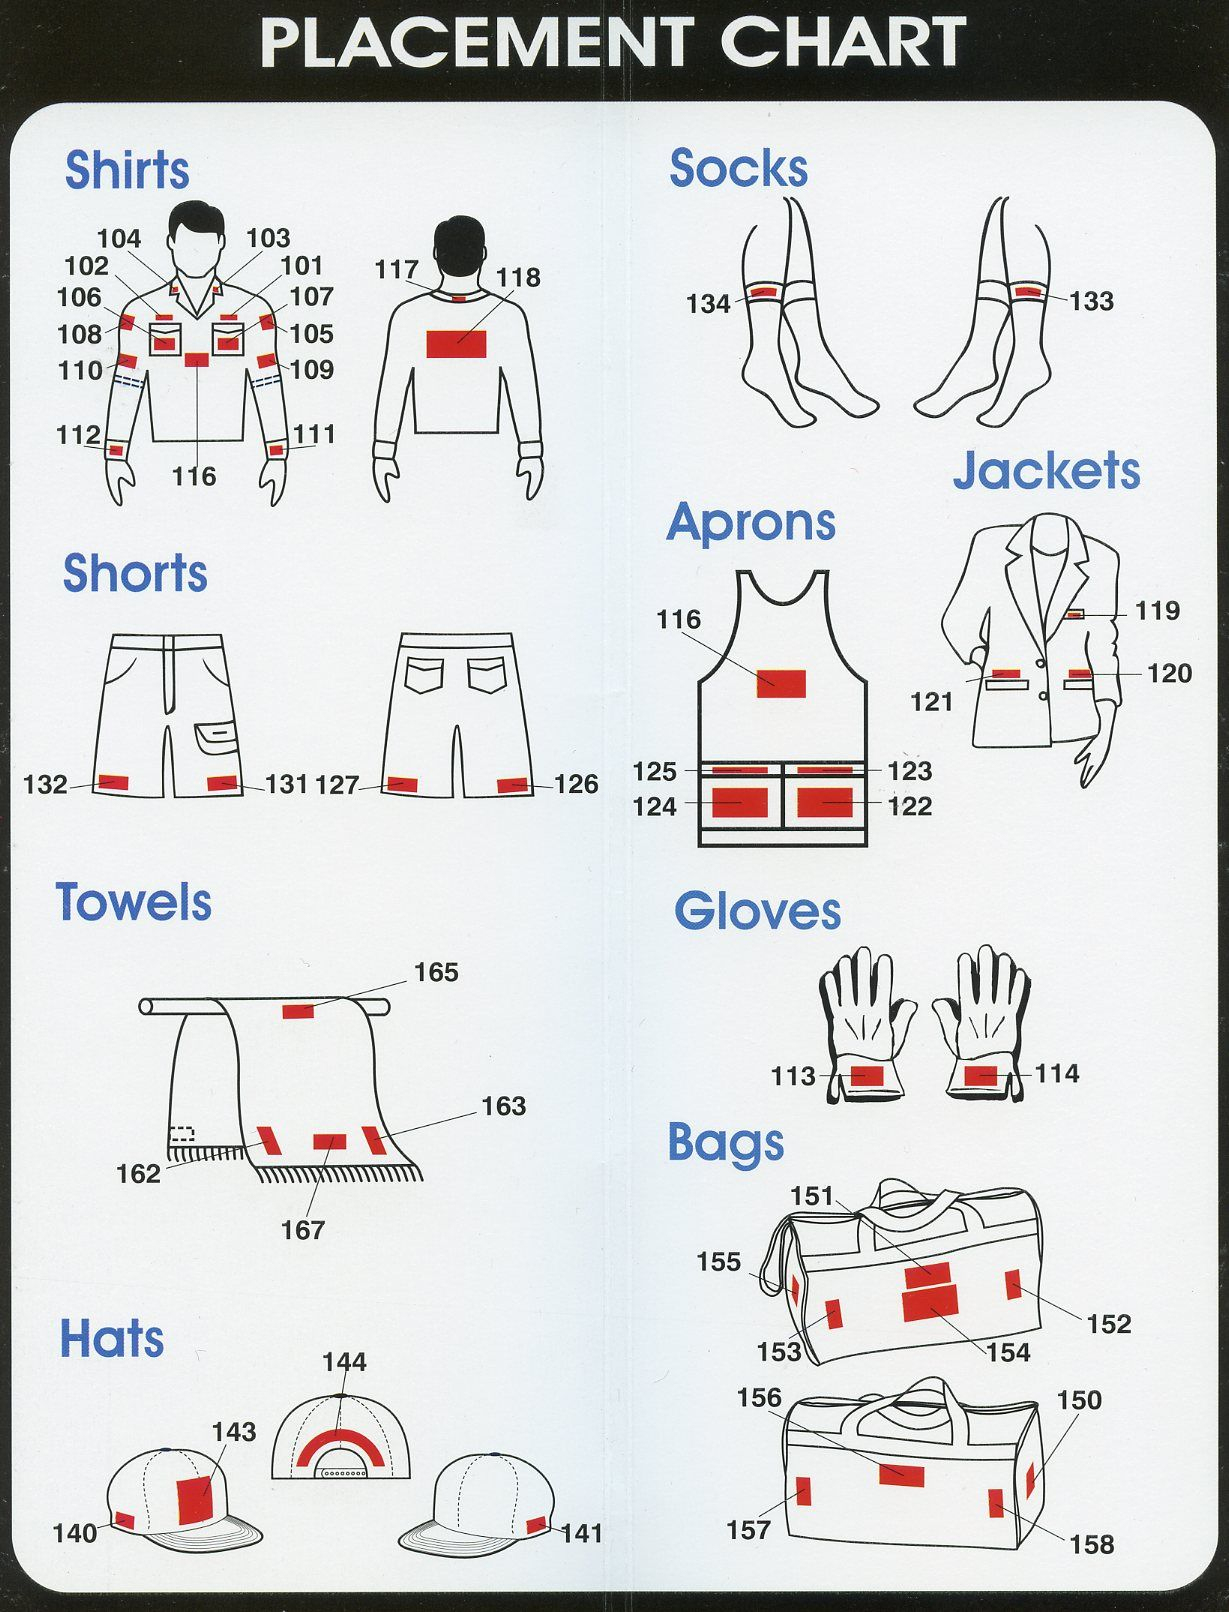
Embroidery Design Placement Chart
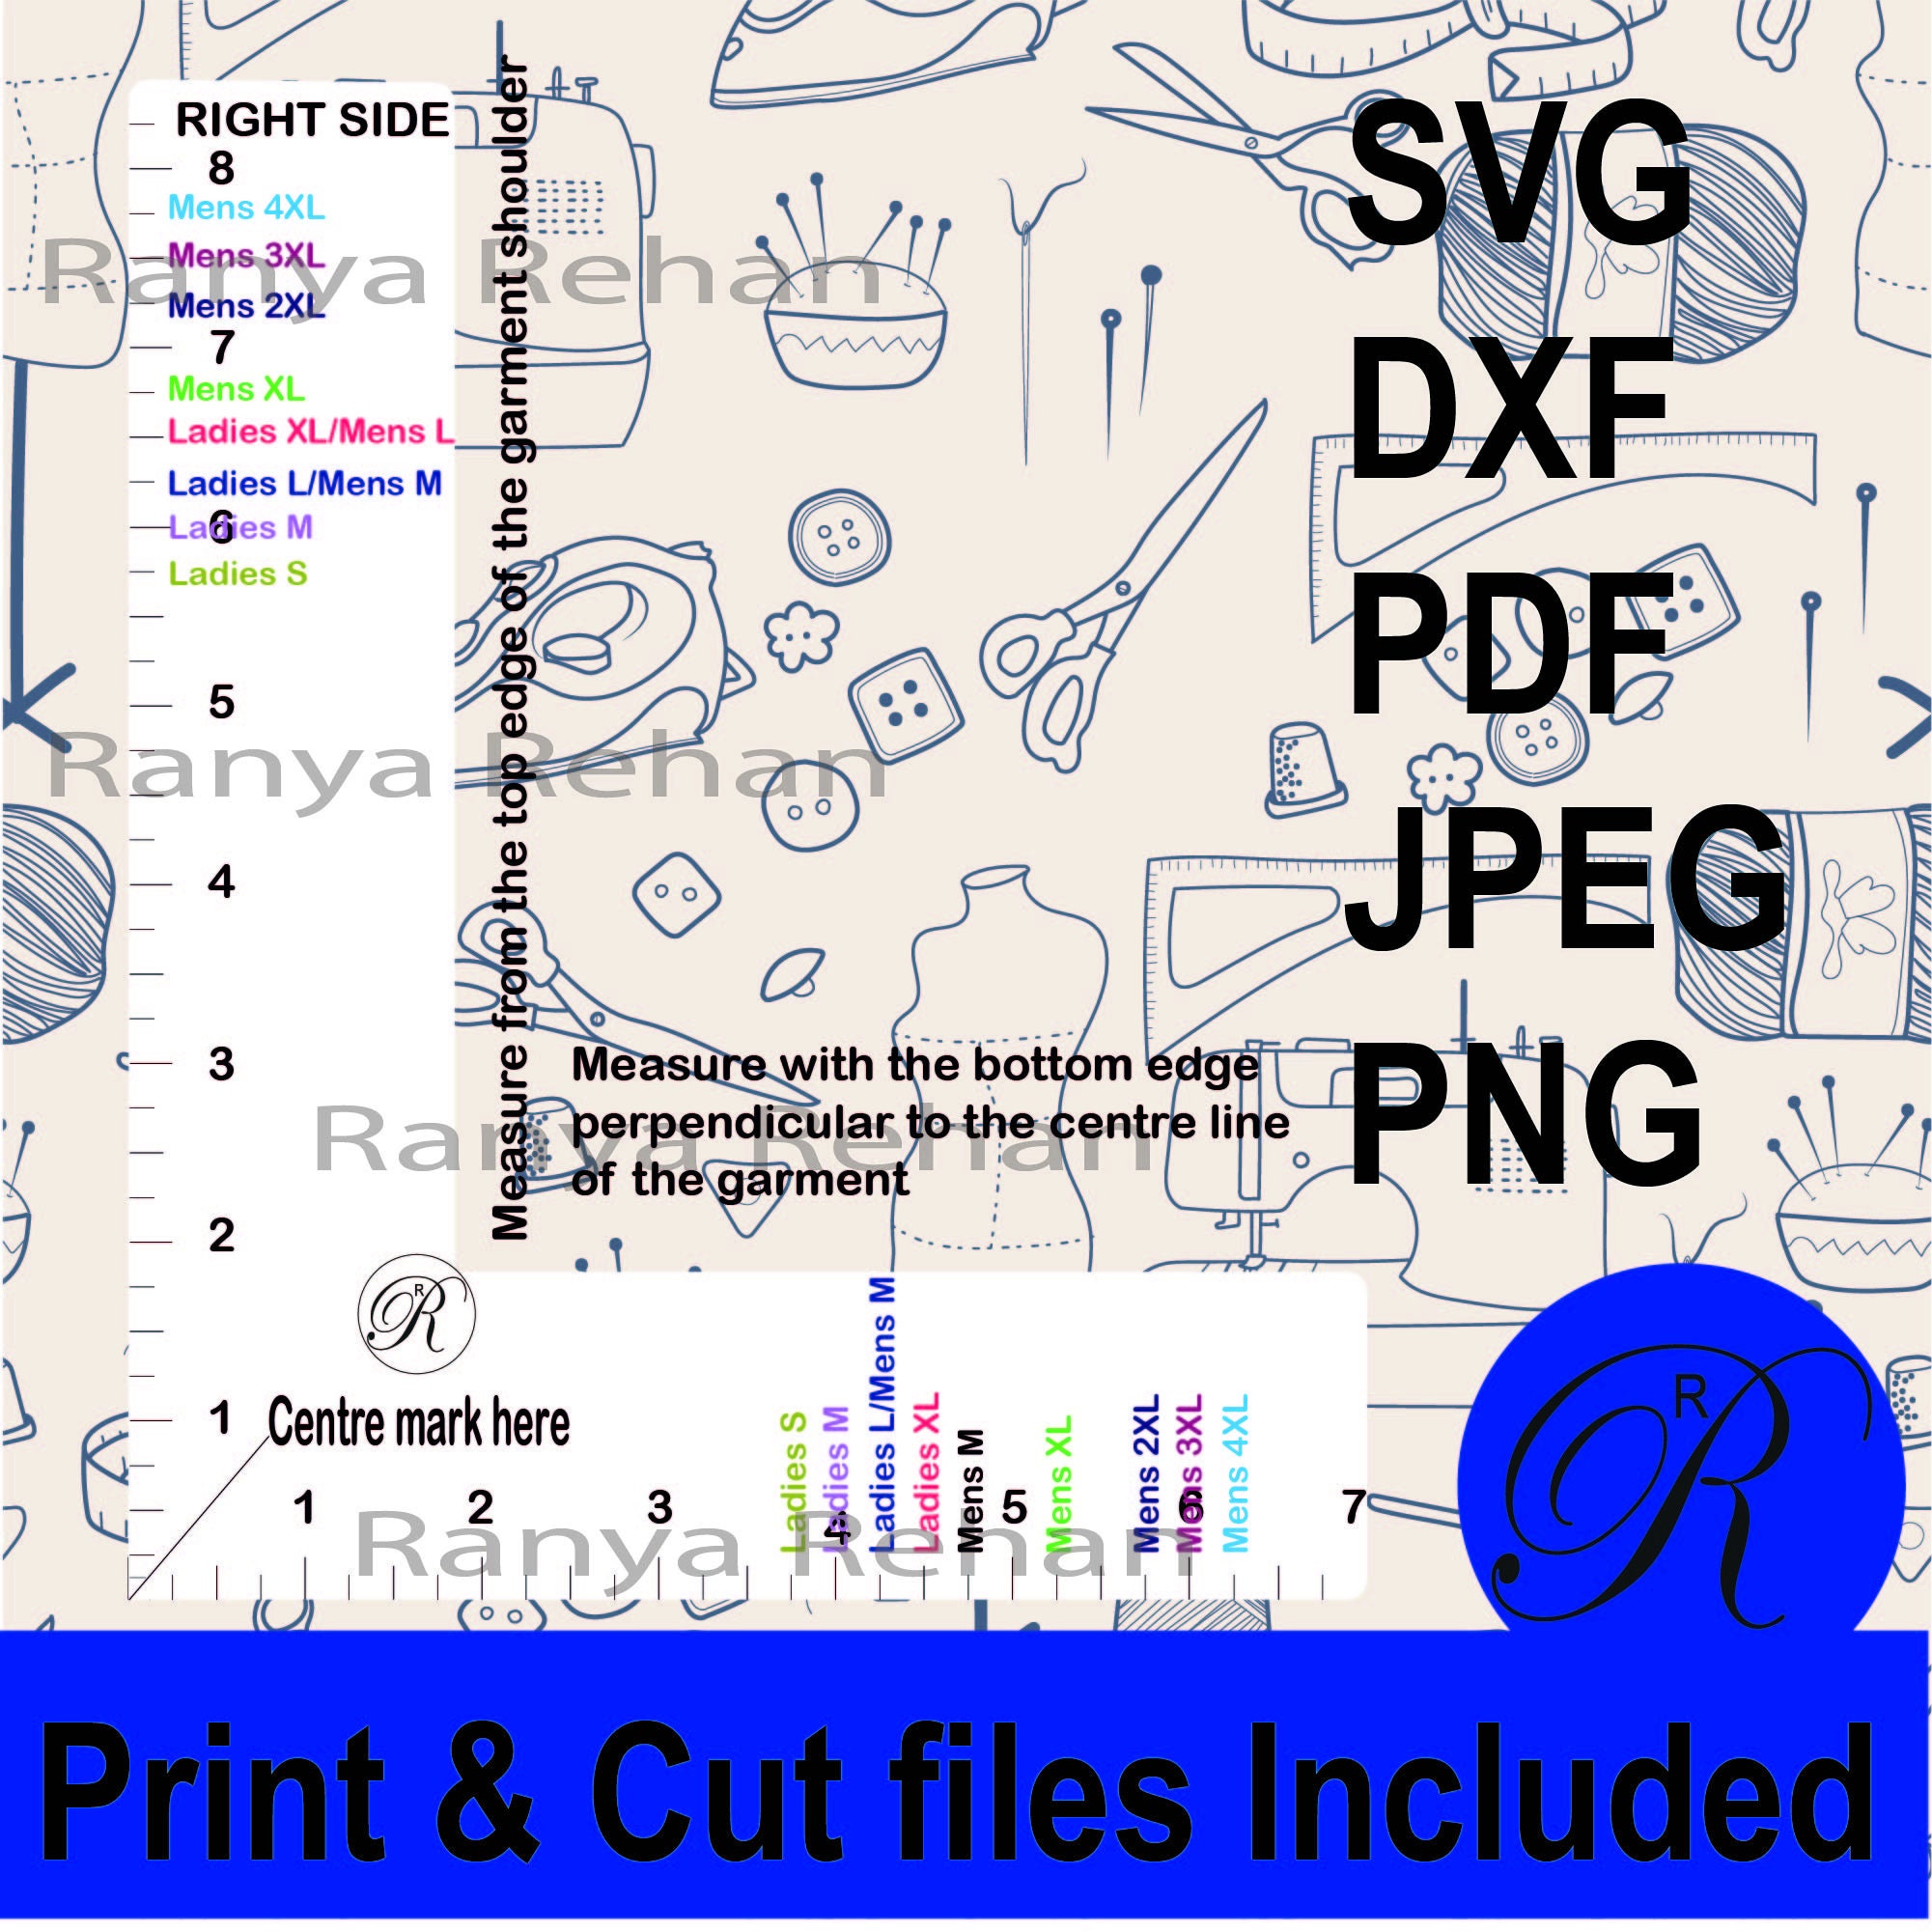
Leftside Adult Printable Machine Embroidery Logo Placement Guide for
Logo Placement On Hoodies Significantly Impacts Brand Visibility And Message Delivery.;
How To Determine The Embroidery Placement Measurement.
To Get An Idea For Where You'd Like To Place A Design, Use A Template.
Print Out Designs Before Embroidering, And Place Them Around The Skirt To Figure Out Equal Distances Between Designs.
Related Post: